How to Use a Foam Roller for Back Pain (and What Mistakes to Avoid)
-
Andra Picincu
Foam rolling can work wonders for back pain, but only if done with proper form. Use the wrong technique, and instead of getting relief, you might not see any results—or worse, you could end up irritating your spine.
Some people avoid foam rolling their back simply because they assume it’s unsafe. Others go to the opposite extreme, putting their full body weight onto the roller in hopes of easing neck or lower back pain. Neither approach is correct.
This form of self-massage can be both safe and effective. The secret lies in how you position yourself on the roller. A small shift in technique, especially when your muscles are already warm, makes all the difference.
So, here’s how to use a foam roller for lower back pain without messing things up.
How Does Foam Rolling Help with Back Pain?
During a deep tissue massage, the therapist finds a tight spot, applies sustained pressure, and holds it until the tissue releases. It’s uncomfortable at first, but then something gives, and the relief is immediate.
A foam roller does the same thing, but it uses your own bodyweight as the force.
By applying controlled pressure to the muscles alongside your spine, it breaks down adhesions and scar tissue that accumulate from overuse, injuries, or simply sitting at a desk all day. At the same time, it signals your nervous system that it’s safe for the muscles to relax.
As the muscles loosen up, blood flow improves, tissue elasticity increases, and your range of motion (ROM) expands. In the long run, you may experience:
- Better flexibility
- Lasting pain relief
- More efficient muscle activation
- Faster post-workout recovery
- Reduced muscle tension
- Correction of muscle imbalances
- Decreased trigger point sensitivity
Using a foam roller for back pain helps your muscles stretch, unknot, and return to their natural alignment. The process takes time, but some benefits—like reduced tension and enhanced ROM—can be felt instantly.
For example, a 2024 study found that foam rolling causes both immediate and long-term changes in lumbar spine mobility and pressure pain threshold.
Most participants showed measurable gains in spinal mobility after just a single session, with results continuing to improve over a four-week program. The effects were still noticeable six months after the program ended.
Another study had similar results. Young adults who performed foam roller exercises showed greater mobility of the thoracolumbar fascia, the connective tissue wrapping the deep back muscles.
As the researchers note, fascial dysfunction is a common driver of musculoskeletal pain. Therefore, foam rolling may help reduce discomfort and even prevent it from developing in the first place.
Using a Foam Roller for Back Pain: Here's How to Do It Right
The National Academy of Sports Medicine (NASM) and other health organizations advise against foam rolling the lower back directly.
One explanation is that lower back pain often stems from a mechanical issue, such as an excessive arch in the lumbar spine. Lying across a foam roller tends to push that arch further while compressing the lumbar vertebrae and the discs between them, which can make things worse.
However, that doesn’t mean you should avoid the lumbar area entirely. As mentioned earlier, technique is everything.
Here’s how to do it right.
The Safe Way to Foam Roll Your Lower Back
Your thoracic spine has the rib cage around it, which spreads your bodyweight evenly across the roller. This built-in support makes rolling the upper and mid back feel stable and controlled.
The lumbar spine has no such protection. Roll directly over it, and you’re dumping the full weight of your upper body onto a handful of small bony projections. That’s the last thing you want when you’re already in pain.
To stay safe, never place the roller directly on your spine. Instead, follow these steps:
- Choose your tool: A foam roller works well for larger areas, but a tennis ball or lacrosse ball offers more precision for specific tight spots.
- Position it beside your spine: Place the roller to the left or right of your spine so you’re working the muscles alongside the vertebrae, not the bony structures.
- Use your bodyweight strategically: Shift your weight toward the side you’re targeting. This keeps the pressure on the muscle tissue and off the spine.
- Brace your core: Keep your core engaged to support your weight—don’t just collapse onto the roller. Your core controls how much pressure you apply.
- Move slowly: Make a couple of slow, deliberate passes up and down the back. The goal is to find and address areas that hold tension rather than rolling quickly past them.
- Apply pressure as needed: When you hit a spot that feels especially tight, pause and hold gentle pressure for 30 to 60 seconds. This gives your nervous system time to register the sustained load and signal the muscles to loosen up.
- Don’t push through pain: Mild discomfort is normal, whereas sharp or shooting pain is a signal to stop and reassess your position.
💡 To keep things simple, massage the muscles on either side of your spine and not the bony bits. Make a couple of slow passes up and down, pausing to apply gentle pressure on any tight spots you find.
Now for the Easy Part: Foam Rolling Your Upper Back
The upper and mid back are a different story. Your thoracic vertebrae are naturally protected by the rib cage, which acts as a brace around the spine, making direct foam rolling in this area both safe and effective.
Most people carry significant tension here, often showing up as neck pain, stiffness, or muscle knots between the shoulder blades. If you spend long hours sitting or working at a desk, this is certainly one area that needs extra attention.
Here’s how to use a foam roller for upper back pain:
- Position the roller horizontally across your upper back, just below the shoulder blades.
- Support your head and neck with your hands to keep your spine aligned.
- Lift your hips slightly off the ground to control how much pressure you apply.
- Make slow, deliberate passes from your shoulders down to your lower ribs—no further.
- Pause on tight spots and hold for 30 to 60 seconds.
- Inhale slowly, and with each exhale, let your body relax a little further into the roller to deepen the release.
- Stop at the rib cage. Anything below that is the lumbar spine, which requires a different foam rolling technique.
⚠️ Don’t roll below the rib cage. That’s where the lumbar spine begins, and as discussed earlier, pain in this area is best addressed by targeting the muscles alongside the spine rather than rolling directly over it.
Best Foam Roller Exercises for Back Pain
Sometimes, lower back pain has nothing to do with the spine itself but with the tight muscles around and below it.
The psoas, for instance, is a deep hip flexor that connects the lumbar spine to the femur. When it becomes tight or overactive, it can pull the lumbar spine forward, triggering lower back pain, knee pain, or even right-side abdominal pain.
With that in mind, make a habit of foam rolling the muscles that most commonly contribute to lower back tension:
- Erector spinae: These long muscles run alongside your spine, supporting posture and spinal extension. When they tighten up, they can pull the lower back into excessive extension and cause lumbar pain.
- Hamstrings: Tight hamstrings tilt the pelvis backward, flattening the natural curve of the lumbar spine and placing stress on the surrounding structures.
- Piriformis: This small but powerful muscle sits deep in the glutes. When it becomes tight, it can irritate the sciatic nerve and create pain that radiates through the lower back, hip, or leg.
- Psoas: The psoas is the only muscle that connects the thoracic spine to the leg. Prolonged sitting keeps it in a constantly shortened state, resulting in lower back pain.
- IT band: This thick band of connective tissue runs along the outside of the thigh. When restricted, it can alter hip mechanics and contribute to both hip and lower back discomfort.
Ready to roll? Try these simple moves to release tension in the lower and upper back:
Lat Roll

Muscles targeted: latissimus dorsi, teres major
Best for: pain, tightness, and muscle knots in the mid-back
Instructions:
- Lie on your right side with the foam roller positioned just below your armpit.
- Keep your right leg flat on the floor for stability. Plant your left foot firmly in front of you for better control.
- Slowly roll down toward the mid-back, moving at a deliberate pace—about an inch per second.
- When you hit a tight or tender spot, stop and hold for 30 to 60 seconds before moving on.
- Work the area for up to a minute, then switch sides and repeat.
- Repeat two or three times on each side.
Upper Back Release

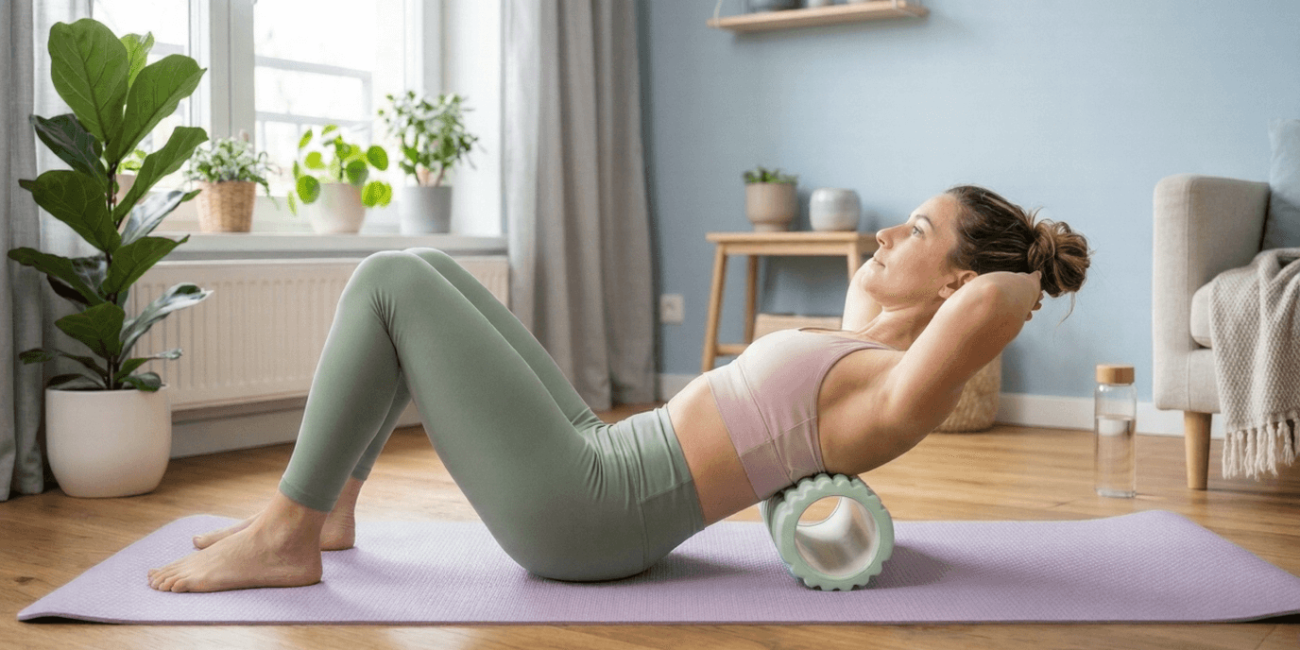
Muscles targeted: traps, rhomboids
Best for: pain, tightness, and muscle knots in the upper back
Instructions:
- Start by lying on an exercise mat with your knees bent and feet flat on the floor.
- Position the foam roller horizontally across your upper back, just below the shoulder blades.
- Clasp your hands loosely behind your head to support your neck.
- Keeping your hips grounded, slowly lower your head toward the floor and let the thoracic spine extend gently over the roller.
- Hold for a breath or two, then return to the starting position. Do 3 to 5 reps.
- Shift the roller down an inch or two and repeat, working your way gradually from the upper to the middle back.
- Move slowly and never force the extension. Let gravity and your own bodyweight do the work.
Rolling Figure Four

Muscles targeted: glutes, hip flexors, piriformis
Best for: pain and tightness in the lower back or hips
Instructions:
- Sit on top of a foam roller with your right hand planted on the floor behind you for support.
- Bend your knees and keep your feet flat on the floor.
- Cross your right ankle over your left knee, forming a figure four with your legs.
- Shift your weight slightly into the right glute and hip so the roller sinks into the piriformis—a deep muscle that, when tight, can cause lower back and hip pain.
- Make slow passes back and forth, then transition into small circular motions, spending about 30 seconds on each.
- When you hit a tight spot, stop and hold until you feel the tension release.
- Switch sides and repeat.
Hamstring Roll

Muscles targeted: hamstrings
Best for: lower back pain, hip tightness, posterior knee pain
Instructions:
- Sit on the floor with a foam roller under your right thigh.
- Plant both hands on the floor behind you for support, keeping your posture upright.
- Bend your left knee and place your foot flat on the floor for added stability.
- Press into your hands while lifting your hips a few inches off the ground.
- Slowly roll down toward the back of the knee, stopping just before you reach it—never roll directly under the knee joint itself, as this can irritate the delicate structures there.
- Return to the start and continue at a deliberate pace.
- If you find a tight spot, pause and hold for 30 to 60 seconds before continuing.
- Roll for about 45 seconds, then switch legs and repeat.
IT Band Foam Rolling

Muscles targeted: tensor fasciae latae (TFL), outer quadriceps, glutes
Best for: hip pain, knee pain, lower back tightness
Instructions:
- Lie on your left side with the foam roller positioned under the outer thigh of your left leg, just below the hip.
- Stack your right leg on top of your left, or place your right foot flat on the floor in front of you for added stability.
- Support your upper body with your left forearm and hand, keeping your core engaged throughout.
- Using your arms, slowly move your body back and forth so the roller travels the full length of the IT band, from just below the hip down to just above the knee.
- Apply gentle pressure. The IT band sits over sensitive muscle tissue, and too much pressure can irritate these delicate structures.
- Roll slowly for 20 seconds, then switch sides and repeat.
- Repeat twice on each side.
While the IT band consists of connective tissue and can’t really be stretched or “released,” foam rolling the outside of the thigh can still be helpful.
What you’re really targeting is the vastus lateralis, the largest of the quadriceps muscles, which lies directly beneath it. When this muscle gets tight, it can create that familiar feeling of tension or pulling along the outside of the knee.
Tightness in the vastus lateralis can also influence how the hip and pelvis move. When the muscles around the outer thigh are stiff, they can limit smooth hip motion, which may contribute to that sense of strain some people feel in the lower back.
Rolling the area eases that muscular tension, helping the knee, hip, and lower back move more freely.
DO’s and DON'Ts of Foam Rolling Your Back
Using a foam roller for back pain takes practice and a bit of patience. Backaches rarely have a single, obvious cause. It could be a herniated disc, a tight psoas, poor posture, or other issues you might not be aware of.
Still, when done correctly, foam rolling can help ease tension, increase mobility, and ease pain. And unless you’re putting direct pressure on the spine, it’s unlikely to cause any harm.
That said, keep these DO’s and DON’Ts in mind to get the most out of your foam rolling routine:
✅ DO roll at a slow, consistent pace—about an inch per second.
✅ DO pause and apply gentle pressure on tight areas for up to 90 seconds.
✅ DO use your roller at least twice a week or, even better, make it part of your daily routine. The benefits are cumulative.
✅ DO roll the surrounding areas first if a spot is too painful to target directly. Working the tissue around an extremely tender area can reduce sensitivity before you move in closer.
✅ DO breathe deliberately. Inhale slowly, and with each exhale, let your body relax a little further into the roller.
✅ DO focus on the muscles you used during your workout, as well as the ones above and below them.
✅ DO align your body properly on the foam roller and adjust the pressure as needed.
✅ DO start with a softer roller if you’re new to this practice. Using a dense or heavily textured roller on tight, sensitive muscles can cause pain.
✅ DO roll perpendicular to the muscle fibers every now and then. Moving side-to-side, not just up and down, can reach adhesions and tight areas more thoroughly.
❌ DON’T roll directly over the spine, joints, or bones. Only use the roller on muscle tissue, such as your quads, hamstrings, or lats.
❌ DON’T ignore the muscles surrounding your problem area. If your lumbar region is acting up, roll the psoas, glutes, hamstrings, and other muscles that influence lumbar mechanics—not just the lower back itself.
❌ DON’T spend more than two minutes on any single muscle group. Beyond that, you’re unlikely to get additional benefits.
❌ DON’T roll through sharp or radiating pain. Mild discomfort is normal and expected. Sharp, shooting, or radiating pain, on the other hand, suggests nerve irritation or a deeper issue that foam rolling won’t fix.
❌ DON’T foam roll an acutely injured or inflamed area. Give it time to settle down first.
❌ DON’T hold your breath or tense up. If a spot is so uncomfortable that you can’t relax and breathe normally, you’re either applying excessive pressure or using a roller that’s too firm.
❌ DON’T roll so fast that you feel nothing. Foam rolling shouldn’t be painful, but it shouldn’t be completely comfortable either. If you’re doing it right, you’ll notice a mild, manageable discomfort.
❌ DON’T use foam rolling as a substitute for professional care. Foam rolling is a powerful self-care tool, but chronic or worsening pain requires professional evaluation. Self-care should complement, not replace, physical therapy and/or medical treatment when pain persists.
❌ DON’T expect instant results. While some sessions may bring quick relief, the most meaningful changes occur over time.
Last but not least, invest in a quality foam roller. A medium‑ or firm‑density roller with ridges or knobs will suit most needs. Softer models can work for beginners or sensitive areas, but they compress too easily to provide meaningful pressure.
Ideally, choose a roller with a hard plastic inner cylinder and dense foam on the outside. It will last longer and deliver more consistent results than one made of foam alone.
Start Using a Foam Roller for Back Pain Relief
Foam rolling, often called the “poor man’s massage,” can be more effective than massage therapy. It’s free, convenient, and lets you manage pain, soreness, and tightness as needed without leaving the house.
I get a weekly massage for lower back pain and muscle knots, but I still wouldn’t feel nearly as good without rolling daily or every other day. I’ve even bought a small, compact foam roller that comes with me on the road, which has allowed me to stay (almost) pain-free for months at a time without booking professional massage services.
Using a foam roller for back pain relief is well worth it. While it’s not a universal fix, it can help with sciatica, lumbar stenosis, hip pain, and muscle contractures in the upper, mid, or lower back. It also facilitates post-workout recovery, which may boost athletic performance in the long run.
Try it yourself—it could be one of the best things you’ve ever done for your back.
Foam Rolling FAQ
It depends on how you do it. Rolling directly over the lumbar spine is not recommended because the lower back lacks the rib cage protection of the thoracic spine. Therefore, your bodyweight lands on the vertebrae and discs rather than being distributed evenly.
That said, foam rolling the muscles alongside the lumbar spine, not the spine itself, is both safe and effective. The key is shifting your weight slightly to one side so the pressure stays on the muscle tissue.
When you apply sustained pressure to a tight muscle, your Golgi tendon organs signal the nervous system that it's safe to relax—a process called autogenic inhibition. The result is a release of muscle tension that can feel immediately satisfying.
Foam rolling also increases blood flow to the target area, which delivers oxygen and nutrients to fatigued tissue. This chain reaction is what produces that distinctive "hurts so good" sensation.
Spend about 30 to 60 seconds on each muscle group, pausing for up to 90 seconds on particularly tight spots. Don't exceed two minutes on any single area—beyond that, the returns diminish, and you risk over-stimulating sensitive tissue.
For reference, a foam rolling session targeting the upper back, glutes, hamstrings, and surrounding muscles should take around 10 to 15 minutes.
Research suggests that rolling at least three times a week produces meaningful, lasting results, with daily rolling being even more beneficial.
Think of it like brushing your teeth: the more consistently you do it, the better the outcome. Even five to 10 minutes a day can make a significant difference over time.
You can foam roll before or after exercise, depending on your goals.
- Rolling before a workout loosens tight tissue and improves range of motion without the performance loss associated with static stretching.
- Rolling after exercise helps clear metabolic waste, reduce delayed onset muscle soreness, and prevent adhesions from forming as the muscles recover.
I recommend rolling after your workout, since that's when it tends to be most beneficial for recovery and pain relief. For best results, pair it with these post-workout stretches for lower back pain.
Yes, and it's generally harmless. The cracking sound is caused by gas bubbles releasing from the fluid surrounding the joints—the same mechanism as knuckle cracking. Most people find it feels good.
However, if the cracking is accompanied by sharp pain or happens repeatedly in the same spot, it may indicate a joint issue that needs attention. Consider seeing a physical therapist to get a proper assessment.
Foam rolling can make back pain worse, but only when the technique is off. Rolling directly over the spine, moving too fast, applying excessive pressure to an inflamed area, or foam rolling an acute injury can aggravate pain.
If your symptoms consistently worsen after foam rolling, stop and check in with an orthopedist or physical therapist to see what's going on.
It depends on your experience level and sensitivity. If you’re new to foam rolling or have particularly tender muscles, start with a soft or medium‑density roller. It provides enough pressure to be effective without causing unnecessary discomfort. As your tissue adapts, you can move up to a firmer model for deeper work.
For back pain specifically, a medium to firm roller with ridges or knobs tends to work best. The added texture helps you target tight spots more precisely than a smooth foam roller.
Whatever you choose, look for a model with a hard inner cylinder and a thick outer layer of dense foam. This kind of foam roller will hold its shape over time and deliver more consistent pressure than cheap all-foam rollers that compress under your bodyweight.
Foam rolling may or may not relieve sciatica pain, depending on what's causing your symptoms.
Sciatica is often aggravated by a tight piriformis muscle compressing the sciatic nerve. Foam rolling the piriformis, glutes, and hamstrings can ease that tension and reduce discomfort.
However, if your sciatica stems from structural issues like a herniated disc, foam rolling is unlikely to fix the problem. In such cases, consult a healthcare professional before you start using a foam roller for back pain.
The IT band doesn't have pain receptors in the same way muscles do. What you're actually feeling is the sensitivity of the vastus lateralis, the large quadriceps muscle that lies directly beneath it. When this muscle is tight, pressure from the roller can feel intense.
Start with lighter pressure, work the surrounding areas first, and build up gradually. Over time, as the underlying muscle releases, the discomfort becomes more manageable.
Daily foam rolling is safe and, for most people, highly beneficial. Unlike strength training, it doesn't break down muscle tissue in a way that requires rest days. Just make sure you avoid rolling acutely injured or inflamed areas and don't exceed two minutes per muscle group.
Some people notice relief after a single foam rolling session, particularly in terms of reduced muscle tension and improved ROM. More significant and lasting changes typically develop over three to four weeks of consistent practice.
A 2024 study found measurable improvements in lumbar spine mobility and pain threshold after just one session, with results continuing to build over a four-week program and remaining detectable six months later.
Foam rolling can be safe for people with herniated discs, but only when it’s done correctly. Rolling directly over the lumbar spine can aggravate irritated discs, but gently working the surrounding muscles (e.g., your glutes, piriformis, and hamstrings) may help ease referred pain and reduce muscle tension.
Foam rolling shouldn't be painful, but it shouldn't be completely comfortable either. The sweet spot is a mild, manageable discomfort—often described as a "hurts so good" sensation that eases as the muscles begin to loosen up.
If a spot feels unbearable, you're either applying too much pressure, moving too fast, or using a roller that's too firm. Dial back the pressure and slow down.
